
Getty Images/iStockphoto
Troubleshooting the most common issues with Windows 11
When Windows 11 administrators encounter an issue with a desktop without a clear fix, they should perform general troubleshooting steps in a specific order to minimize risk.
When users experience problems with Windows 11, these hinder those users' productivity, so Windows administrators need to find ways to quickly and effectively troubleshoot Windows 11 desktops.
But what should administrators do if their organization has only recently migrated to Windows 11 and there isn't sufficient internal knowledge on how to troubleshoot the specific issue that the user is experiencing?
In this situation, the best option for Windows 11 troubleshooting may be to take a problem-agnostic approach to the troubleshooting process. There are sequential troubleshooting steps that you can use as a desktop administrator for nearly any Windows 11 problem. While these steps are not guaranteed to solve every possible problem, they tend to resolve many Windows 11 issues.
Step 1. Run Windows Update
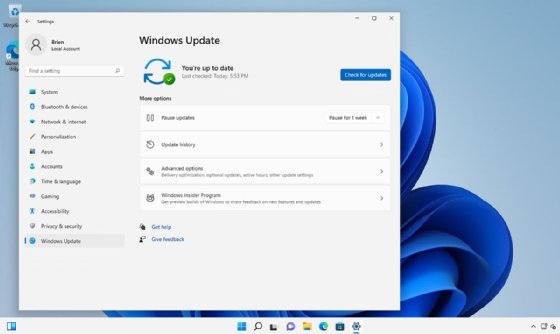
Your first step should be to run Windows Update. In recent years, Windows Update has gotten a reputation as being a tool for applying security patches to Windows systems. While Windows Update does indeed address security problems, that isn't its only purpose. Microsoft frequently releases bug fixes that you can apply via this utility. It is entirely possible that applying all of the available updates may make the problem go away.
To check for available updates, click on Settings. When the Settings screen appears, select the Windows Update tab (Figure 1). Finally, click on the Download Now button.
Step 2. Make sure that the PC has sufficient storage space
If running Windows Update fails to correct the problem, your next step should be to verify that the PC has sufficient disk space. In the past, Windows would be unable to install updates if the machine was running low on disk space. More recently, however, Microsoft began reserving disk space specifically for use by Windows Update. Therefore, a Windows 11 PC could be low on storage even if it allows you to install updates without issue.
Fortunately, it is easy to see how much disk space is available. To do so, open File Explorer, and then click on This PC. Windows shows you how much disk space is available on the system's C: drive (Figure 2).
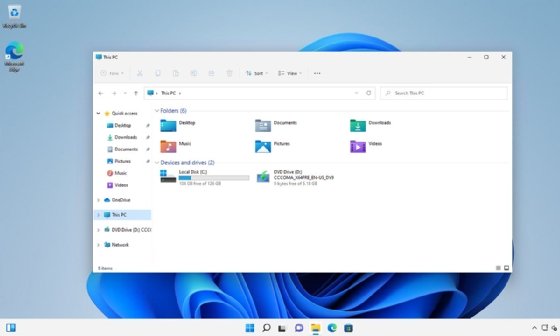
There is no hard rule as to how much free disk space you must have for Windows 11 to function properly. Generally, you need to have at least a few gigabytes of free disk space. If the PC does not have at least 10 GB free, then it may be worth your while to free up any additional disk space.
The easiest way to accomplish this is to right-click on the C: drive and select the Properties option from the shortcut menu. This displays the disk's properties. Make sure you select the General tab and then click the Disk Cleanup button. This displays the Disk Cleanup window (Figure 3).
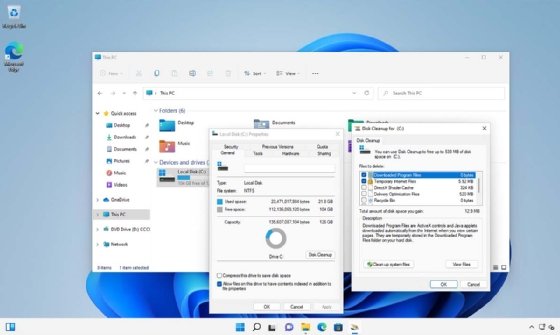
This screen shows you how much space you can reclaim by removing various types of unnecessary files. The interface also enables you to delete these files with a single click rather than requiring that you manually remove each file and folder.
Step 3. Run System File Checker
The next thing that you should do if the problem still persists is to run System File Checker. This is a command-line tool that verifies the integrity of all the Windows system files. If one or more system files have become corrupted or if some of the files are of the wrong version, then it can cause Windows to have any number of problems.
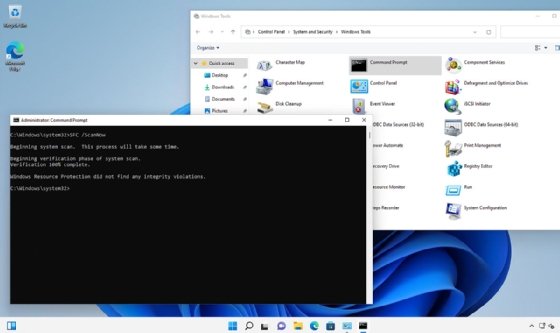
To run System File Checker, click the Start button, followed by the All Apps button. Next, click on Windows Tools. When the Windows Tools screen opens, right-click on the Command Prompt icon, and then select the Run as Administrator option from the shortcut menu. This opens an elevated Command Prompt window. You can run System File Checker by entering the following command:
SFC /ScanNow
If problems are found, System File Checker shows you the compromised files and corrects them (Figure 4).
Step 4. Run a troubleshooter
If nothing that you have done so far has corrected the problem, you should run a troubleshooter. Windows 11 contains numerous built-in troubleshooters that can automatically correct a variety of system problems.
To access the Windows troubleshooters, click on the Settings icon. When the Settings page opens, select the System tab. Then, scroll through the list of options until you locate the Troubleshoot option. Click on Troubleshoot to open the Troubleshoot page. While there are a few basic Windows troubleshooting options that are listed on that page, it is usually best to ignore those options and instead click on Other Troubleshooters. This takes you to a screen containing a long list of automated troubleshooters (Figure 5).
-f_mobile.jpg)
At this point, you need to scroll through the list of troubleshooters to locate the one that most closely matches the problem the PC is experiencing. Once you locate a troubleshooter that seems like a good fit, click the corresponding Run button. This launches the troubleshooter. Each troubleshooter works a little bit differently, but typically, the troubleshooters use a wizard-style interface and guide you through a mostly automated diagnostic and repair process.
Step 5. Roll back the system
If the Windows troubleshooters do not correct the problem, another possible option is to roll the entire system back to a previous point in time. While this option does work well, you can only use it if System Protection is already enabled.
To determine if System Protection is turned on, right-click on the Start button, and click System. When the System window appears, click on Advanced System Settings. This opens the System Properties sheet. Select the System Protection tab, and make sure that System Protection is set to On (Figure 6). It is turned off by default, so someone would have had to switch this purposefully.
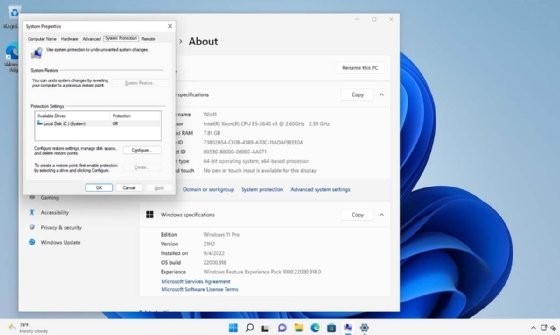
On the System Protection tab, there is a System Restore button near the top of the window. This button is grayed out because System Protection is currently disabled in Figure 6. However, if System Protection is enabled and at least one restore point exists, you can use the System Restore button to revert your system back to an earlier point in time. Of course, you would need this restore point to be at a time when the PC was working properly. The System Restore feature is not intended to act as a true backup substitute, but it does give you the ability to perform point-in-time recovery for Windows 11.
Step 6. Fully reset the PC
One final option that you can use to fix the problem is to reset the PC. Although this option is almost always successful, it should be used as a last resort because it is destructive. When you reset your PC, the PC reinstalls Windows 11 from scratch. At a minimum, this means that you also have to reinstall all the applications. This action can also erase data from the PC as well. As such, you should make sure to back up your data before you attempt to reset the PC.
To reset Windows 11, click on Settings, and then select the System tab. Now, click on the Recovery option, and then click the Reset PC button.
Upon clicking the Reset PC button, you see a screen asking if you want to keep your files but lose everything else or if you want to remove absolutely everything from the PC.


